Sun Haozhe's Blog

Sun Haozhe's Blog


  • Home

  • Categories

  • Archives

  • Tags

  • About

  • Search

Leetcode hints (for competitive coding)

Posted on 2024-02-25 | In Misc
| Words count in article 115

Advanced hints for choosing data structures or algorithms

  • monotonic stack (单调栈): find next/previous greater/smaller XXX
  • backtracking (回溯): find all XXX
  • dynamic programming (动态规划): 可以使用回溯等手段暴力枚举所有解,但是题中只求计算数目或者存在性(不要求返回解的具体形式)。
  • fixed-sized priority queue / heap (固定大小的优先队列或堆): k-th smallest/largest element or top-k smallest/greatest elements, e.g. a k-sized min heap always contains the k largest elements, and vice versa.
Read more »

Python modulo for negative numbers

Posted on 2024-02-16 | In Python
| Words count in article 386

Description

  • When negative numbers are involved, the modulo operator % does not have the same behavior in Python and in C/C++.
  • Both variants are correct, but Python’s modulo is most commonly used in mathematics (number theory in particular). However C’s modulo might be more intuitive for programming…
  • Python has a “true” modulo operation, while C has a remainder operation. It has a direct relation with how the negative integer division is handled, i.e. rounded towards 0 or minus infinite. Python rounds towards minus infinite and C(99) towards 0.
  • In this post, we only consider the case where the numerator (分子, numérateurs) can be negative, the denominator (分母, dénominateurs) is always positive.

In Python (version 3.8.9)

Background

1
2
3
4
5
int_max = 2 ** 31 - 1
int_min = - 2 ** 31

print(int_max, int_min)
print(int_max / 10, int_min / 10)
1
2
2147483647 -2147483648
214748364.7 -214748364.8

Python’s native // and % operators (rounds towards minus infinite)

1
2
print(int_max // 10, int_min // 10)
print(int_max % 10, int_min % 10)
1
2
214748364 -214748365
7 2

Using math to get similar behavior as in C (rounds towards 0)

1
2
3
4
import math

print(int_max // 10, math.ceil(int_min / 10))
print(int_max % 10, int(math.fmod(int_min, 10)))
1
2
214748364 -214748364
7 -8

Note that:

  • math.ceil and math.floor return integers, math.fmod returns floats.
  • math.ceil and math.floor take the sign into account, see below:
1
2
3
4
print(math.floor(4.5))   # 4
print(math.ceil(4.5))    # 5
print(math.floor(- 4.5)) # -5
print(math.ceil(- 4.5))  # -4

References

  • https://stackoverflow.com/questions/1907565/c-and-python-different-behaviour-of-the-modulo-operation
  • https://stackoverflow.com/questions/3883004/how-does-the-modulo-operator-work-on-negative-numbers-in-python
Read more »

Pandas pivot and melt

Posted on 2023-11-26 | In Python
| Words count in article 499

Data is often stored in stacked (long) or record (wide) format.

DataFrame表的重组,长表变宽表 和 宽表变长表。

什么是长表?什么是宽表?这个概念是对于某一个特征而言的。例如:一个表中把性别存储在某一个列中,那么它就是关于性别的长表;如果把性别作为列名,列中的元素是某一其他的相关特征数值,那么这个表是关于性别的宽表。

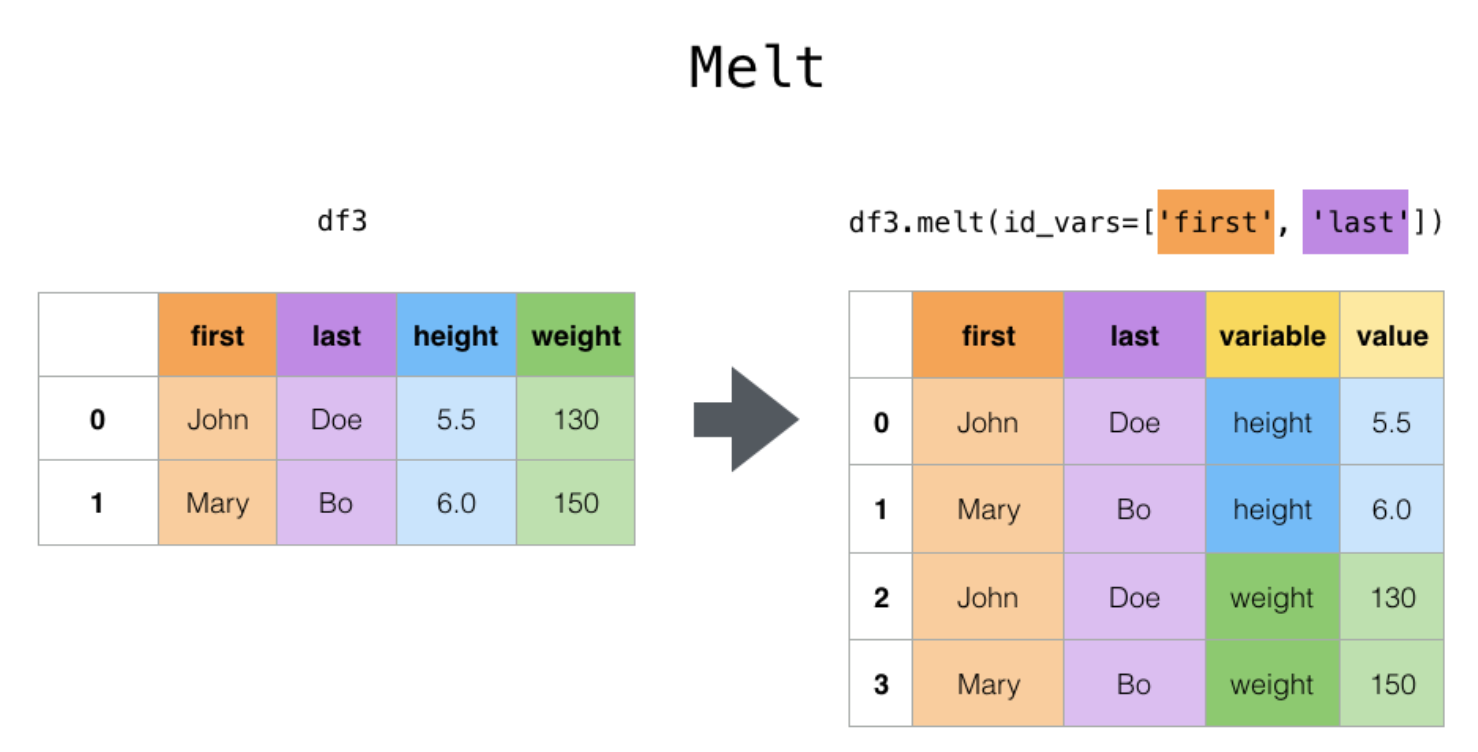
pivot()之后能得到一个宽表,melt()之后能得到一个长表。

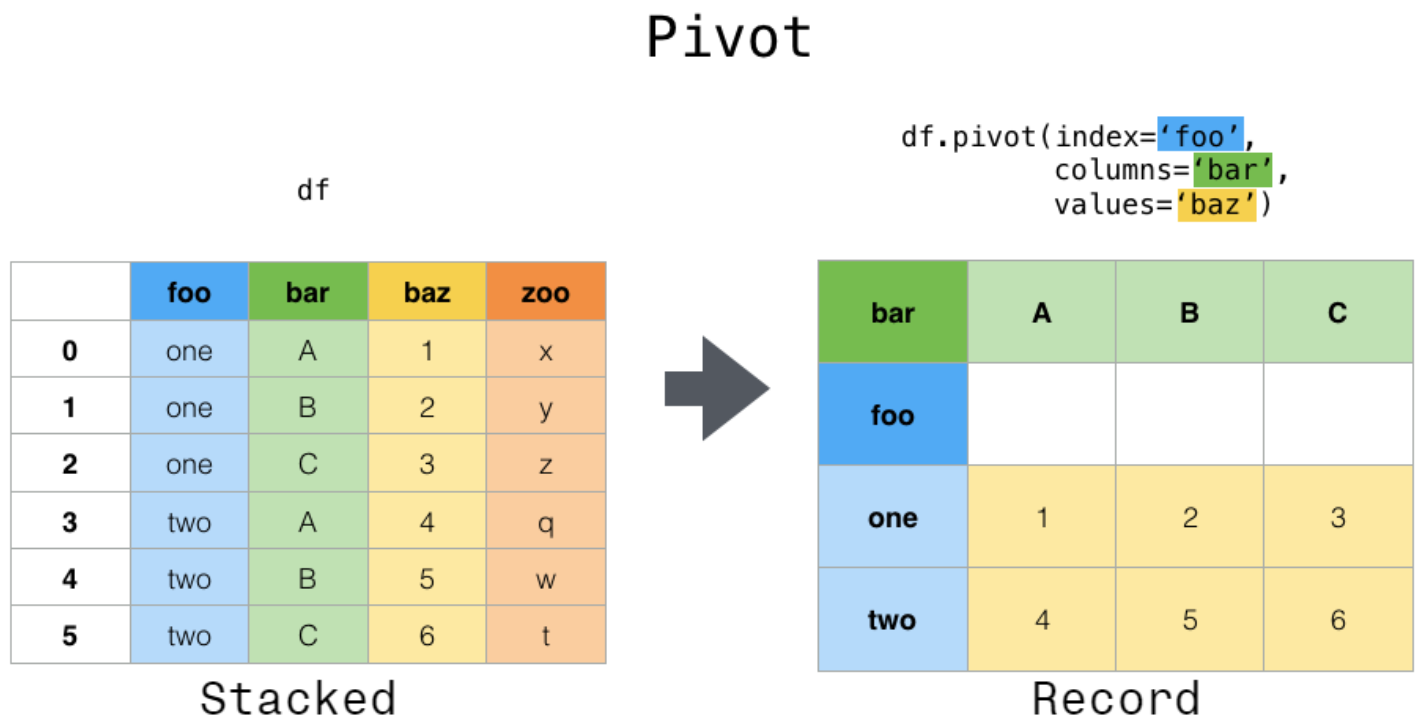
pivot() and pivot_table() 长变宽

pandas_pivot.png

long => wide

Return reshaped DataFrame organized by given index / column values.

Reshape data (produce a “pivot” table) based on column values. Uses unique values from specified index / columns to form axes of the resulting DataFrame.

对于一个基本的长变宽操作而言,最重要的有三个要素,分别是变形后的行索引、需要转到列索引的列,以及这些列和行索引对应的数值,它们分别对应了pivot方法中的index, columns, values参数。新生成表的列索引是columns对应列的unique值,而新表的行索引是index对应列的unique值,而values对应了想要展示的数值列。

1
df.pivot(index='foo', columns='bar', values='baz')
1
2
3
4
bar  A   B   C
foo
one  1   2   3
two  4   5   6

pivot() can only handle unique rows specified by index and columns. If you data contains duplicates, use pivot_table().

pivot的使用依赖于唯一性条件,那如果不满足唯一性条件,那么必须通过聚合操作使得相同行列组合对应的多个值变为一个值。

melt() and wide_to_long() 宽变长

pandas_melt.png

wide => long

Useful to massage a DataFrame into a format where one or more columns are identifier variables (id_vars), while all other columns, considered measured variables (value_vars), are “unpivoted” to the row axis, leaving just two non-identifier columns, “variable” and “value”. The names of those columns can be customized by supplying the var_name and value_name parameters.

1
pd.melt(df, id_vars=['A'], value_vars=['B'], var_name='myVarname', value_name='myValname')
1
2
3
4
   A myVarname  myValname
0  a         B          1
1  b         B          3
2  c         B          5

References:

  • https://pandas.pydata.org/docs/user_guide/reshaping.html#reshaping
  • https://pandas.pydata.org/docs/user_guide/reshaping.html#reshaping-melt
  • https://zhuanlan.zhihu.com/p/352885638
Read more »

Create a list of N empty lists in Python

Posted on 2023-11-13 | In Python
| Words count in article 73

In order to create a list of N empty lists in Python:

1
[[],[],[]...]

The following would not work, because each created empty list is indeed the same object, modifying one of them will impact all others. This can be verified by checking that they all share the same python object ids (id())

1
[[]] * N

One correct way of doing is the following:

1
[[] for _ in range(N)]
Read more »

Those unexpected celebrity lineages

Posted on 2023-09-10 | In Misc
| Words count in article 621

那些出乎意料的名人世系 Those unexpected celebrity lineages

只收录比较可靠的。争议较大的,明显牵强附会的,传说性质的不予收录。

春秋时期晋国范武子(士会,“范氏”的始祖,范氏支流在秦国为刘氏。晋朝六卿被赵氏、韩氏、魏氏、智氏、范氏、中行氏六家垄断),汉高祖刘邦

晋朝淮阴令萧整,梁武帝萧衍,江祯(唐末改姓),江泽民

朱元璋,岷庄王朱楩(朱元璋庶十八子),朱镕基

司马卬(音áng,战国后期被项羽封为殷王,统领河内,建都朝歌),司马懿,晋武帝司马炎

赵奢(战国时代赵国将军,受封马服君),马援(汉光武帝时伏波将军),马超(蜀汉五虎将)

殷商帝乙(商纣王之父),宋公仲(宋国第二任国君,微仲),孔父嘉(春秋宋国大夫),孔子; 建安七子之一的孔融和打乒乓球的孔令辉都是孔子后人

杜周(京兆杜氏始祖,汉武帝时的酷吏),杜延年(杜周之子,御史大夫,霍光下属,汉宣帝麒麟阁十一功臣之一),杜预(西晋学者兼名将,领导西晋灭孙吴,时誉“杜武库”,中国历史上唯二同时进文庙和武庙的人); 杜甫(杜预子杜耽之后)和杜牧(杜预子杜尹之后)都是杜预后人

杨喜(刘邦阵营郎中骑,随灌婴部队追杀项羽,分尸项羽封侯),杨敞(chǎng,杨喜曾孙,弘农杨氏始祖,汉昭帝时丞相,霍光下属); 弘农杨氏后人包括 西晋杨骏,隋朝杨素,杨贵妃,隋朝皇室是否出自弘农杨氏有争议

虞阏父(胡公满之父,禹所封舜之子商均的三十二世孙,周武王时主管制作陶器),胡公满(陈胡公,春秋陈国开国君主,舜后裔),陈完(田完,陈厉公之子。因避难入齐,事齐桓公,陈与田古音相近),田和(田氏代齐,陈完十世孙,田氏齐国开国君主),田建(田齐亡国君主),田安(田建孙子,被项羽封为济北王),王莽(新朝皇帝,田安六世孙)

Read more »

Logical reasoning

Posted on 2023-06-02 | In Misc
| Words count in article 492

Deductive reasoning, deduction, 演绎推理, 正向推理

如果前提为真,则结论必然为真。

Deduction is a form of reasoning in which a conclusion follows necessarily from the stated premises.

Inductive reasoning, induction, 归纳, 归纳推理

前提可以预测出高概率的结论,但是不确保结论为真。

它基于对特殊的代表(token)的有限观察,把性质或关系归结到类型;或基于对反复再现的现象的模式(pattern)的有限观察,公式表达规律。

Induction is a form of inference producing propositions about unobserved objects or types, either specifically or generally, based on previous observation.

Inductive reasoning contrasts strongly with deductive reasoning in that, even in the best, or strongest, cases of inductive reasoning, the truth of the premises does not guarantee the truth of the conclusion. Instead, the conclusion of an inductive argument follows with some degree of probability.

David Hume (大卫·休谟):

  • Hume argued that inductive reasoning and belief in causality cannot be justified rationally; instead, they result from custom and mental habit. We never actually perceive that one event causes another but only experience the “constant conjunction” of events. This problem of induction means that to draw any causal inferences from past experience, it is necessary to presuppose that the future will resemble the past, a metaphysical presupposition which cannot itself be grounded in prior experience.

Analogical reasoning, 类比

Analogical reasoning is a form of inductive reasoning from a particular to a particular.

Abductive reasoning, abduction, abductive inference, retroduction, 溯因推理, 反绎推理, 反向推理

从事实推理到最佳解释的过程。换句话说,它是开始于事实的集合,并推导出其最佳解释的推理过程。

It is a form of logical inference that seeks the simplest and most likely conclusion from a set of observations.

Abductive reasoning, or argument to the best explanation, is a form of reasoning that doesn’t fit in deductive or inductive, since it starts with incomplete set of observations and proceeds with likely possible explanations so the conclusion in an abductive argument does not follow with certainty from its premises and concerns something unobserved. What distinguishes abduction from the other forms of reasoning is an attempt to favour one conclusion above others, by subjective judgement or attempting to falsify alternative explanations or by demonstrating the likelihood of the favoured conclusion, given a set of more or less disputable assumptions. For example, when a patient displays certain symptoms, there might be various possible causes, but one of these is preferred above others as being more probable.

Read more »

Default download directory (python libraries)

Posted on 2022-07-13 | In Python
| Words count in article 18

timm

1
/Users/sun-haozhe/.cache/torch/hub/checkpoints/resnet152_a1h-dc400468.pth

transformers (Hugging Face)

1
2
3
4
~/.cache/huggingface/hub


/Users/sun-haozhe/.cache/huggingface/hub

datasets (Hugging Face)

1
2
3
4
~/.cache/huggingface/datasets


/Users/sun-haozhe/.cache/huggingface/datasets
Read more »

Latex compilation

Posted on 2022-03-20 | In Misc
| Words count in article 415

Compilers

pdfLaTeX is usually the default compiler:

  • pdfLaTeX supports .png, .jpg, .pdf image formats. It will convert .eps images to .pdf on-the-fly during compilation, which may prolong the compilation time required. (pdfLaTeX may not be able to handle pstricks well on Overleaf.)
  • LaTeX supports only .eps and .ps image formats for use with \includegraphics. If all the images in your project are .eps files, then this compiler setting is recommended.
  • XeLaTeX and LuaLaTeX both supports UTF-8 robustly out of the box, as well as Truetype and OpenType. They are therefore recommended if you need to typeset non-Latin scripts on Overleaf, in conjunction with the polyglossia pacakge. They also support all of the .png, .jpg, .pdf and .eps image formats.
  • XeLaTeX supports pstricks; but LuaLaTeX doesn’t.

Output formats

  • (DVI) Device independent file format consists of binary data describing the visual layout of a document in a manner not reliant on any specific image format, display hardware or printer.
  • (PS) PostScript file format describes text and graphics on page and it is based on vector graphics. PostScript is, until now, a standard in desktop publishing areas.
  • (PDF) Portable Document Format is a file format, based on PostScript, used to represent documents in a manner independent of application software, hardware, and operating systems. It is now widely used as a file format for printing and for distribution on the Web.

If you are required to produce a DVI file from your Overleaf project:

  • Make sure you’re using only .eps and .ps images in your project.
  • Click on the Overleaf menu icon above the file list panel, and set the Compiler setting to ‘LaTeX’.
  • Recompile your project.
  • Click on the “Logs and output files” button next to the Recompile button.
  • Scroll right to the bottom, and click on “Other logs and output files”.
  • You should then able to download the generated .dvi file.

If you need to convert the DVI file into PS yourself

  • cd to a dedicated folder
  • Place the generated/downloaded .dvi file into the dedicated folder (for example, let’s call it output.dvi).
  • Place all .eps image files in the dedicated folder. Even if the images were previously placed into a fig/ subfolder, you need to place .eps image files at the same directory level as the .dvi file.
  • Type the following (dvips can be installed with MacTex or equivalent):
1
2
3
4
5
dvips -P pdf -o output.ps output.dvi

# The -P pdf option generates a 
# PS file smoother on the screen 
# when further converted to PDF.

References

  • https://www.overleaf.com/learn/latex/Choosing_a_LaTeX_Compiler
Read more »

rsync - a remote and local file synchronization tool

Posted on 2022-03-10 | In Misc
| Words count in article 735

rsync, which stands for remote sync, is a remote and local file synchronization tool. It uses an algorithm to minimize the amount of data copied by only moving the portions of files that have changed. It’s included on most Linux distributions by default. To use rsync to sync with a remote system, you only need SSH access configured between your local and remote machines, as well as rsync installed on both systems.

Examples

1
2
3
4
5
6
7
8
9
10
11
12
# push local to remote
rsync -azP ~/dir1 username@remote_host:dir2

# pull remote to local
rsync -azP username@remote_host:dir1 ~/dir2

# push everything excluding things in .gitignore, 
# .git/ is also transferred. 
rsync -azP --filter=":- .gitignore" . username@remote_host:dir2

# use custom identity file (ssh private key)
rsync -azP --filter=":- .gitignore" -e "ssh -i /path/to/private_key" . username@remote_host:dir2

In order to synchronize local files with several remote servers, one can create a file called rsync.sh and place it in the source folder (e.g. the root directory for git), the content of rsync.sh can be:

1
2
3
4
5
#!/bin/bash

rsync -azP --filter=":- .gitignore" . username@remote_host1:target_dir
rsync -azP --filter=":- .gitignore" . username@remote_host2:target_dir
rsync -azP --filter=":- .gitignore" -e "ssh -i /path/to/private_key" . username@remote_host3:target_dir

However, you must ensure that the remote target directory does belong to username. If the target directory is created by a docker container which runs as root, it is possible that the target directory belongs to root and username may not have write access to it. In order to change the owner of the target directory from root to username:

  • ssh into the remote server
  • docker exec into the docker container (which runs as root)
  • Run the command chown -R owner-user:owner-group target_directory
  • Go back to local system and run bash rsync.sh

owner-user and owner-group can be found be typing ls -l. With ls -l, owner-user goes first, owner-group goes second. In the container, it is possible that owner-user and owner-group showed by ls -l are integer IDs instead of human readable string names. If the string names of owner-user and owner-group are the same, then the integer ID of owner-group may be a+1 supposing that the integer ID of owner-user is a.

Options

  • -r recursive, necessary for directory syncing
  • -a a combination flag and stands for “archive”. This flag syncs recursively and preserves symbolic links, special and device files, modification times, groups, owners, and permissions. It’s more commonly used than -r and is the recommended flag to use.
  • -n or --dry-run practice run
  • -v verbose
  • If you’re transferring files that have not already been compressed, like text files, you can reduce the network transfer by adding compression with the -z option
  • -P combines the flags --progress and --partial. This first flag provides a progress bar for the transfers, and the second flag allows you to resume interrupted transfers
  • By default, rsync does not delete anything from the destination directory. You can change this behavior with the --delete option
  • If you prefer to exclude certain files or directories located inside a directory you are syncing, you can do so by specifying them in a comma-separated list following the --exclude= option
  • --backup option can be used to store backups of important files. It’s used in conjunction with the --backup-dir option, which specifies the directory where the backup files should be stored
  • sync everything excluding things in .gitignore: --filter=":- .gitignore" (there’s a space before “.gitignore”), which tells rsync to do a directory merge with .gitignore files and have them exclude per git’s rules.
  • rsync uses default identity file present in ~/.ssh/ directory on Linux. In case you want to use a custom rsync file you can use -e or –rsh option of rsync. for example -e "ssh -i /path/to/private_key"

Trailing slash “/”

A trailing slash (/) at the end of the source path signifies the contents of the source path. Without the trailing slash, the source path, including the directory, would be placed within the target path.

1
2
3
4
5
# only the files within the directory are transferred
rsync -a dir1/ dir2

# the directory itself is transferred
rsync -a dir1 dir2
1
rsync -anv dir1/ dir2
1
2
3
4
5
6
7
8
9
10
./
file1
file2
file3
file4
file5
file6
file7
file8
file9
1
rsync -anv dir1 dir2 
1
2
3
4
5
6
7
8
9
10
dir1/
dir1/file1
dir1/file2
dir1/file3
dir1/file4
dir1/file5
dir1/file6
dir1/file7
dir1/file8
dir1/file9
Read more »

Startup scripts of bash and zsh

Posted on 2022-03-09 | In Misc
| Words count in article 1416

All shells have startup files, containing commands which are executed as soon as the shell starts.

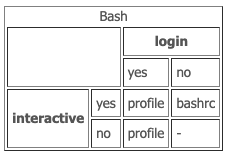
Bash

For Bash, they work as follows. Read down the appropriate column. Executes A, then B, then C, etc. The B1, B2, B3 means it executes only the first of those files found.

For an “interactive non-login shell”, it reads .bashrc, but for an “interactive login shell” it reads from the first of .bash_profile, .bash_login and .profile (only).

Shells could be simply divided into three types as below: interactive login, interactive non-login, and just simple script that runs without any interaction with user action.

1
2
3
4
5
6
7
8
9
10
11
12
13
14
15
16
17
18
19
20
21
22
23
24
+----------------+-----------+-----------+------+
|                |Interactive|Interactive|Script|
|                |login      |non-login  |      |
+----------------+-----------+-----------+------+
|/etc/profile    |   A       |           |      |
+----------------+-----------+-----------+------+
|/etc/bash.bashrc|           |    A      |      |
+----------------+-----------+-----------+------+
|~/.bashrc       |           |    B      |      |
+----------------+-----------+-----------+------+
|~/.bash_profile |   B1      |           |      |
+----------------+-----------+-----------+------+
|~/.bash_login   |   B2      |           |      |
+----------------+-----------+-----------+------+
|~/.profile      |   B3      |           |      |
+----------------+-----------+-----------+------+
|BASH_ENV        |           |           |  A   |
+----------------+-----------+-----------+------+
|                |           |           |      |
+----------------+-----------+-----------+------+
|                |           |           |      |
+----------------+-----------+-----------+------+
|~/.bash_logout  |    C      |           |      |
+----------------+-----------+-----------+------+

Please note that each script can add or undo changes made in previously called script.

When invoked as an interactive login shell, Bash looks for the /etc/profile file, and if the file exists , it runs the commands listed in the file. Then Bash searches for ~/.bash_profile, ~/.bash_login, and ~/.profile files, in the listed order, and executes commands from the first readable file found (only).

When Bash is invoked as an interactive non-login shell, it reads and executes commands from ~/.bashrc, if that file exists, and it is readable.

  • /etc/profile - It contains Linux system wide environment and startup programs. This file runs first when a user logs in to the system. This file also acts as a system-wide profile file for the bash shell.
  • .bash_profile is read and executed when Bash is invoked as an interactive login shell, while .bashrc is executed for an interactive non-login shell.
  • Use .bash_profile to run commands that should run only once, such as customizing the $PATH environment variable. Put the commands that should run every time you launch a new shell in the .bashrc file. This include your aliases and functions, etc. Typically, ~/.bash_profile contains lines source the .bashrc file. This means each time you log in to the terminal, both files are read and executed.
  • Most Linux distributions are using ~/.profile instead of ~/.bash_profile. The ~/.profile file is read by all shells, while ~/.bash_profile only by Bash.
  • On OS X, Terminal by default runs a login shell every time, this is a little different to most other systems, but you can configure that in the preferences.
  • OSX’s Terminal App does something non-standard: it creates every new tab or window as if it were a login shell, which means that .bash_profile is called.

bash_startup_scripts_summary.png

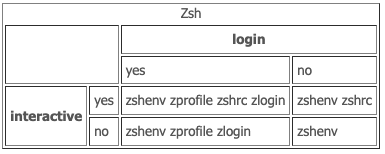
Zsh

Zsh always executes ~/.zshenv. Then, depending on the case:

  • run as a login shell, it executes ~/.zprofile
  • run as an interactive, it executes ~/.zshrc
  • run as a login shell, it executes ~/.zlogin

zsh_startup_scripts_summary.png

In my case (MacOS), ~/.zshenv, ~/.zprofile, ~/.zlogin do not exist. ~/.zshrc looked like this:

1
2
3
4
5
6
7
8
9
10
11
12
13
14
15
16
PATH=/Library/Frameworks/Python.framework/Versions/3.6/bin:/usr/local/bin:/usr/bin:/bin:/usr/sbin:/sbin:/Library/TeX/texbin:/Library/Frameworks/Mono.framework/Versions/Current/Commands:/Users/sun-haozhe/anaconda/bin:/opt/local/bin:/opt/local/sbin

# >>> conda initialize >>>
# !! Contents within this block are managed by 'conda init' !!
__conda_setup="$('/Users/sun-haozhe/anaconda/bin/conda' 'shell.zsh' 'hook' 2> /dev/null)"
if [ $? -eq 0 ]; then
    eval "$__conda_setup"
else
    if [ -f "/Users/sun-haozhe/anaconda/etc/profile.d/conda.sh" ]; then
        . "/Users/sun-haozhe/anaconda/etc/profile.d/conda.sh"
    else
        export PATH="/Users/sun-haozhe/anaconda/bin:$PATH"
    fi
fi
unset __conda_setup
# <<< conda initialize <<<

However after upgrading MacOS to Monterey (or Big Sur), the code that involved conda takes a lot of time to execute: each time a new terminal is opened, it gets stuck and its header shows that python is executing. This usually takes several seconds (at least) to get finished. Otherwise one needs to type the Return key on the keyboard to get out of this. In order to avoid this stucking behavior, ~/.zshrc is modified to be:

1
PATH=/Library/Frameworks/Python.framework/Versions/3.6/bin:/usr/local/bin:/usr/bin:/bin:/usr/sbin:/sbin:/Library/TeX/texbin:/Library/Frameworks/Mono.framework/Versions/Current/Commands:/Users/sun-haozhe/anaconda/bin:/opt/local/bin:/opt/local/sbin

With the upgrade of MacOS to Monterey (or Big Sur), the default python installation seems to be broken (/Library/Frameworks/Python.framework/Versions/3.6/bin). So I further change the order of paths to put that in the end of the paths in order to better avoid such issues. I also added /Users/sun-haozhe/my_virtualenv_python/venv_py38/bin in the beginning of the paths, because python and jupyter found there seem to work well.

1
PATH=/Users/sun-haozhe/my_virtualenv_python/venv_py38/bin:/usr/local/bin:/usr/bin:/bin:/usr/sbin:/sbin:/Library/TeX/texbin:/Library/Frameworks/Mono.framework/Versions/Current/Commands:/Users/sun-haozhe/anaconda/bin:/opt/local/bin:/opt/local/sbin:/Library/Frameworks/Python.framework/Versions/3.6/bin

Update from 2022.12.28:

On MacOS Monterey Version 12.6 (21G115), when I typed virtualenv, it gave an error /System/Library/dyld/dyld_shared_cache_x86_64h' .... This StackOverflow post suggests removing /Library/Frameworks/Python.framework/Versions/3.6 from the PATH environment variable. I did it. My PATH environment variable now becomes:

1
PATH=/Users/sun-haozhe/my_virtualenv_python/venv_py38/bin:/usr/local/bin:/usr/bin:/bin:/usr/sbin:/sbin:/Library/TeX/texbin:/Library/Frameworks/Mono.framework/Versions/Current/Commands:/Users/sun-haozhe/anaconda/bin:/opt/local/bin:/opt/local/sbin

Then when I typed virtualenv, it returns virtualenv command not found. So I did pip install virtualenv in the virtual environment venv_py38, then virtualenv works.

Types of shell: interactive and login shells

  • Basically, the shell is just there to take a list of commands and run them; it doesn’t really care whether the commands are in a file, or typed in at the terminal. In the second case, when you are typing at a prompt and waiting for each command to run, the shell is interactive; in the other case, when the shell is reading commands from a file, it is, consequently, non-interactive.
  • When you first log into the computer, the shell you are presented with is interactive, but it is also a login shell. If you type bash, it starts up a new interactive shell: because you didn’t give it the name of a file with commands in, it assumes you are going to type them interactively. Now you’ve got two interactive shells at once, one waiting for the other: it doesn’t sound all that useful, but there are times when you are going to make some radical changes to the shell’s settings temporarily, and the easiest thing to do is to start another shell, do what you want to do, and exit back to the original, unaltered, shell — so it’s not as stupid as it sounds. However, that second shell will not be a login shell. One way of making a shell a login shell is to run it yourself with the option -l; typing bash -l will start a bash that also thinks it’s a login shell.
  • In simple terms, an interactive shell is a shell that reads and writes to a user’s terminal, while a non-interactive shell is a shell that is not associated with a terminal, like when executing a script. An interactive shell can be either login or non-login shell.
  • Login shells don’t have to be interactive.
  • A login shell is invoked when a user login to the terminal either remotely via ssh or locally, or when Bash is launched with the –login option. An interactive non-login shell is invoked from the login shell, such as when typing bash in the shell prompt or when opening a new Gnome terminal tab.

References

  • https://shreevatsa.wordpress.com/2008/03/30/zshbash-startup-files-loading-order-bashrc-zshrc-etc/
  • https://youngstone89.medium.com/unix-introduction-bash-startup-files-loading-order-562543ac12e9
  • https://linuxize.com/post/bashrc-vs-bash-profile/#:~:text=bash_profile%20is%20read%20and%20executed,customizing%20the%20%24PATH%20environment%20variable%20.
  • https://tanguy.ortolo.eu/blog/article25/shrc#:~:text=Both%20Bash%20and%20Zsh%20use,for%20interactive%20or%20login%20shells.
Read more »

Python type hints

Posted on 2022-03-02 | In Python
| Words count in article 775

Declare argument type and return type of a function

  • Add a colon : and a data type after each function parameter
  • Add an arrow (->) and a data type after the function (and before the colon :) to specify the return data type
  • If you’re working with a function that shouldn’t return anything, you can specify None as the return type: -> None:
1
2
def greeting(name: str) -> str:
    return "Hello " + name

This states that the expected type of the name argument is str, the expected return type is str. Expressions whose type is a subtype of a specific argument type are also accepted for that argument.

Type hints may be built-in classes (including those defined in standard library or third-party extension modules), abstract base classes, types available in the types module, and user-defined classes (including those defined in the standard library or third-party modules).

You can still set a default value for the parameter, as shown below:

1
2
def greeting(name: str = "Mike") -> str:
    return "Hello " + name

Adding type hints has no runtime effect by default. A static type checker like mypy can solve this “issue”.

Variable annotations

Just like with functions, you can add type hints to variables.

The typing Module

Python’s typing module can make data type annotations even more verbose. For example, you can specifically declare a list of strings, a tuple containing three integers, and a dictionary with strings as keys and integers as values.

1
2
3
4
5
6
7
8
from typing import List, Tuple, Dict

e: List[str] = ['a', 'b', 'c']
f: Tuple[int, int, int] = (1, 2, 3)
g: Dict[str, int] = {'a': 1, 'b': 2}

def square_(arr: List[float]) -> List[float]:
    return [x ** 2 for x in arr]

The Union operator allows you to specify multiple possible data types for variables and return values:

1
2
3
4
5
6
7
8
from typing import Union

# The function can now both accept and 
# return a list of integers or floats, 
# warning-free.

def square_(arr: List[Union[int, float]]) -> List[Union[int, float]]:
    return [x ** 2 for x in arr]

The mypy library

https://github.com/python/mypy

12.6 k stars and 2.1 k forks up to March 2, 2022.

mypy is a static type checker for Python.

Type checkers help ensure that you’re using variables and functions in your code correctly. With mypy, add type hints (PEP 484) to your Python programs, and mypy will warn you when you use those types incorrectly.

Python is a dynamic language, so usually you’ll only see errors in your code when you attempt to run it. mypy is a static checker, so it finds bugs in your programs without even running them!

mypy is designed with gradual typing in mind. This means you can add type hints to your code base slowly and that you can always fall back to dynamic typing when static typing is not convenient.

By default, mypy will not type check dynamically typed functions. This means that with a few exceptions, mypy will not report any errors with regular unannotated Python.

After installation, you can type-check the statically typed parts of a program like this:

1
mypy PROGRAM

You can always use the Python interpreter to run your statically typed programs, even if mypy reports type errors:

1
python PROGRAM

mypy can be integrated into popular IDEs, including Vim, Emacs, Sublime Text, Atom, PyCharm, VS Code.

History and motivation

Python has always been a dynamically typed language, which means you don’t have to specify data types for variables and function return values. PEP 484 introduced type hints — a way to make Python feel statically typed.

Since the initial introduction of type hints in PEP 484 (Type Hints) and PEP 483 (The Theory of Type Hints), a number of PEPs have modified and enhanced Python’s framework for type annotations, this includes PEP 526, PEP 544, PEP 585, etc.

As the code base gets larger, type hints can help to debug and prevent some dumb mistakes. If you’re using an IDE like PyCharm, you’ll get a warning message whenever you’ve used the wrong data type, provided you’re using type hints.

Type hints in Python can be both a blessing and a curse. On the one hand, they help in code organization and debugging, but on the other can make the code stupidly verbose. To compromise, we can use type hints only for function declaration — both parameter types and return values — but avoid them for anything else, such as variables. In the end, Python should be simple to write.

Read more »

Submitting latex project to arXiv

Posted on 2022-01-17 | In Misc
| Words count in article 356

bibtex

If you use .bib file, you need to upload the corresponding .bbl file onto arXiv. .bbl file can be obtained by locally compile the source latex files. You may also download the .bbl file from OverLeaf.

Which files/folders to upload?

Folders containing all figures, .tex files, .bib files, .bbl files, .sty files should be included. Other files should be deleted before uploading to arXiv, for example .pdf, .aux, .log, .blg, .out, .synctex.gz files.

The name (before .tex or .bib) of the .bib file should be the same as the corresponding .tex file. For example, main.tex and main.bib (thus main.bbl).

If you have a second .tex file, say supplement.tex. It will also be compiled and the generated pdf will be concated at the end of the generated pdf of main.tex. Consider adding supplement.bib and supplement.bbl.

Zip all the files (the whole folder) and upload the .zip file to arXiv.

OverLeaf support for arXiv

Overleaf has a feature to submit to arXiv.

arxiv_submit_button.png

arxiv_submit_2.png

arxiv_submit_3.png

See: LaTeX checklist for arXiv submissions (OverLeaf)

natbib issues

If some of your bib items do not contain year information, natbib package might raise errors which prevent you from compiling your project on arXiv. In this case, add the option numbers when you include natbib.

1
\usepackage[numbers]{natbib}

Even if you did not include natbib yourself, it might be included by other packages, for example neurips_data_2021. In the case of neurips_data_2021, you must add \PassOptionsToPackage{numbers}{natbib} before \usepackage[final]{neurips_data_2021}.

PDFLaTeX?

Add \pdfoutput=1 in the first 5 lines of .tex files.

Figures

Figures can be put in folders.

The name of figures should not use symbols like [ or ].

Figures can be .png, .pdf.

hyperref package

1
arXiv Warning: user included plain hyperref directive

Remove \usepackage{hyperref}, do not only comment it out

https://tex.stackexchange.com/a/616620/212587

How to add references?

Just use the usual way: \bibliography{main}, you don’t need to replace that with \input{main.bbl}.

1
2
3
4
5
{
\small
\bibliography{main}
%\input{main.bbl}
}

How to clean comments before submitting to arXiv?

arXiv LaTeX Cleaner from Google: https://github.com/google-research/arxiv-latex-cleaner

Delete all lines beginning with a % from a file: https://stackoverflow.com/a/8206295/7636942

Read more »

VS Code memo

Posted on 2021-11-26 | In Misc
| Words count in article 111

Shortcuts

Default

  • Ctrl/Cmd+J shows and hides the Panel (bottom part, i.e. problems, terminal, Jupyter variables, etc.), no matter which one you are focused on.
  • Ctrl/Cmd+B shows and hides the left-hand bar no matter whether Explorer, Debug etc. is active.
  • Ctrl + Tab (even in MacOS, use Ctrl, not Cmd) changes tabs in order of most recently used.
  • Cmd + / adds or removes per-line comment for multiple lines (ToggleLineComment)

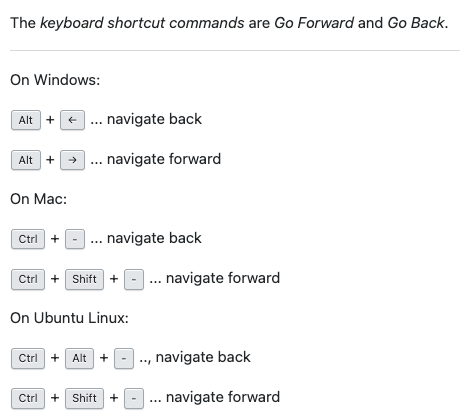
vscode_go_back_go_forward.png

User

  • Ctrl/Cmd+H maximizes the Panel size of restores its default size, i.e. the command View: Toggle Maximized Pane. This keybinding was assigned to the command Test: Toggle Test History in Peek by default, this command now has no keybinding.
Read more »

Time zones

Posted on 2021-09-22 | In Misc
| Words count in article 451

UTC

All time zones are defined as offsets from Coordinated Universal Time (UTC), ranging from UTC−12:00 to UTC+14:00.

GMT

Greenwich Mean Time (GMT) is often interchanged or confused with Coordinated Universal Time (UTC). But GMT is a time zone and UTC is a time standard. GMT and UTC share the same current time in practice. Neither UTC nor GMT ever change for Daylight Saving Time (DST). However, some of the countries that use GMT switch to different time zones during their DST period. For most purposes, UTC is considered interchangeable with GMT, but GMT is no longer precisely defined by the scientific community. UTC is one of several closely related successors to GMT.

CET and CEST

Central European Time (CET) is a standard time which is 1 hour ahead of Coordinated Universal Time (UTC). The time offset from UTC can be written as UTC+01:00. It is used in most parts of Europe and in a few North African countries. CET is also known as Middle European Time and by colloquial names such as Amsterdam Time, Berlin Time, Brussels Time, Madrid Time, Paris Time, Rome Time, and Warsaw Time.

As of 2011, all member states of the European Union observe summer time (daylight saving time), from the last Sunday in March to the last Sunday in October. States within the CET area switch to Central European Summer Time (CEST – UTC+02:00) for the summer.

Time in France

Metropolitan France uses Central European Time (heure d’Europe centrale, UTC+01:00) as its standard time, and observes Central European Summer Time (heure d’été d’Europe centrale, UTC+02:00) from the last Sunday in March to the last Sunday in October.

Time in China

China uses 1 official time zone, China Standard Time (CST), which is 8 hours ahead of UTC (UTC +8). In China, the time zone is known as Beijing Time.

Time in United states

  • Eastern Time Zone: Eastern Standard Time (EST, UTC−05:00), Eastern Daylight Time (EDT, UTC−04:00). New York.
  • Central Time Zone: Central Standard Time (CST, UTC−06:00), Central Daylight Time (CDT, UTC−05:00). Chicago.
  • Mountain Time Zone: Mountain Standard Time (MST, UTC−07:00), Mountain Daylight Time (MDT, UTC−06:00). Salt Lake City.
  • Pacific Time Zone: Pacific Standard Time (PST, UTC−08:00) from early November to mid-March, Pacific Daylight Time (PDT, UTC−07:00) from mid-March to early November. California, Los Angeles.
Read more »

Keyboard shortcuts

Posted on 2021-07-06 | In Misc
| Words count in article 109

Mac OS

  • left_screen (three-finger right): ctrl + left arrow
  • right_screen (three-finger left): ctrl + right arrow
  • mission_control (three-finger up-): ctrl + up arrow
  • go_backward: cmd + left
  • go_forward: cmd + right

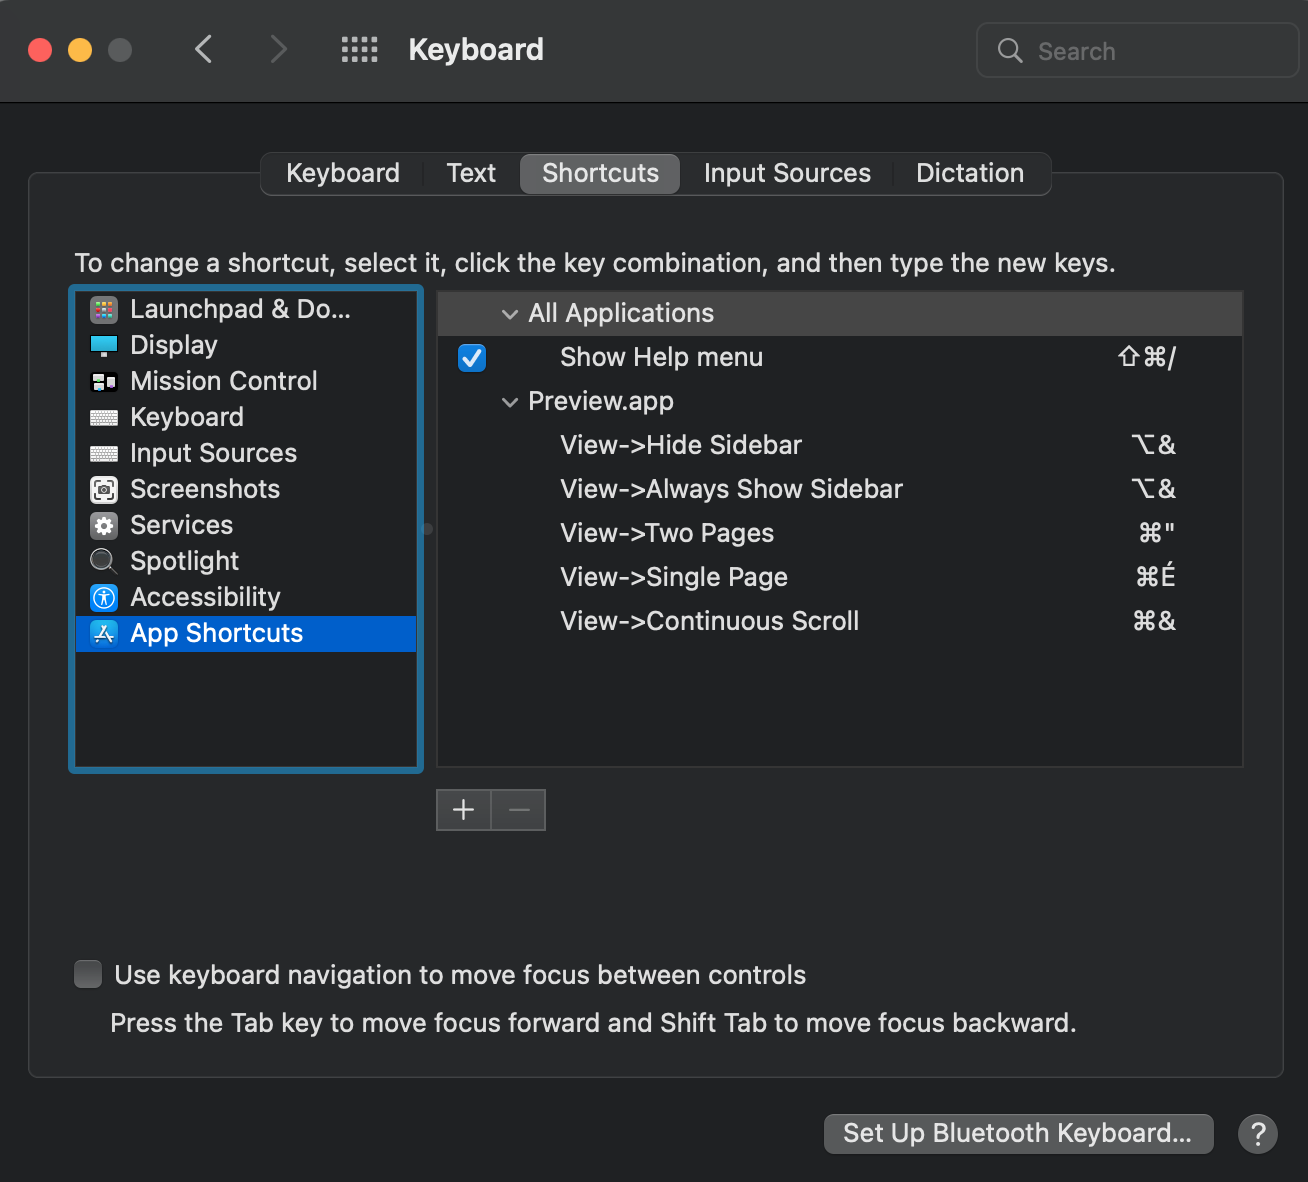
My custom shortcuts for Preview

For the application Preview, Go->Back and Go->Forward no longer use customized shortcuts for MacOS 12 Monterey, because the (new) default shortcuts are easy to use.

preview_shortcuts_v2.png

Logitech G HUB

The shortcuts are useful to create macros for Logitech G HUB.

How to create application-specific macros?

  • Active profile DESKTOP Default ==> Games & Applications ==> add game or application
Read more »

Number of trainable parameters of neural networks in torchvision.models

Posted on 2021-07-04 | In Misc
| Words count in article 1179
1
2
3
4
5
6
7
8
9
10
11
12
13
14
15
16
17
18
19
20
21
22
23
24
25
26
27
28
29
30
31
32
33
34
35
36
37
38
                 model human_readable  nb_trainable_parameters
15       squeezenet1_1          1.24M                  1235496
14       squeezenet1_0          1.25M                  1248424
22  shufflenet_v2_x0_5          1.37M                  1366792
33          mnasnet0_5          2.22M                  2218512
23  shufflenet_v2_x1_0          2.28M                  2278604
28  mobilenet_v3_small          2.54M                  2542856
34         mnasnet0_75          3.17M                  3170208
24  shufflenet_v2_x1_5           3.5M                  3503624
26        mobilenet_v2           3.5M                  3504872
35          mnasnet1_0          4.38M                  4383312
27  mobilenet_v3_large          5.48M                  5483032
36          mnasnet1_3          6.28M                  6282256
25  shufflenet_v2_x2_0          7.39M                  7393996
16         densenet121          7.98M                  7978856
9             resnet18         11.69M                 11689512
21           googlenet            13M                 13004888
17         densenet169         14.15M                 14149480
19         densenet201         20.01M                 20013928
10            resnet34          21.8M                 21797672
29     resnext50_32x4d         25.03M                 25028904
11            resnet50         25.56M                 25557032
20        inception_v3         27.16M                 27161264
18         densenet161         28.68M                 28681000
12           resnet101         44.55M                 44549160
13           resnet152         60.19M                 60192808
0              alexnet          61.1M                 61100840
31     wide_resnet50_2         68.88M                 68883240
30    resnext101_32x8d         88.79M                 88791336
32    wide_resnet101_2        126.89M                126886696
1                vgg11        132.86M                132863336
2             vgg11_bn        132.87M                132868840
3                vgg13        133.05M                133047848
4             vgg13_bn        133.05M                133053736
5                vgg16        138.36M                138357544
6             vgg16_bn        138.37M                138365992
7                vgg19        143.67M                143667240
8             vgg19_bn        143.68M                143678248

Source code:

1
2
3
4
5
6
7
8
9
10
11
12
13
14
15
16
17
18
19
20
21
22
23
24
25
26
27
28
29
30
31
32
33
34
35
36
37
38
39
40
41
42
43
44
45
46
47
48
49
50
51
52
53
54
55
56
57
58
59
60
61
62
63
64
65
66
67
68
69
70
71
72
73
74
75
76
77
78
79
80
81
82
83
84
85
86
87
88
89
90
91
92
93
94
"""
MIT License

Copyright (c) 2021 Haozhe Sun

Permission is hereby granted, free of charge, to any person obtaining a copy
of this software and associated documentation files (the "Software"), to deal
in the Software without restriction, including without limitation the rights
to use, copy, modify, merge, publish, distribute, sublicense, and/or sell
copies of the Software, and to permit persons to whom the Software is
furnished to do so, subject to the following conditions:

The above copyright notice and this permission notice shall be included in all
copies or substantial portions of the Software.

THE SOFTWARE IS PROVIDED "AS IS", WITHOUT WARRANTY OF ANY KIND, EXPRESS OR
IMPLIED, INCLUDING BUT NOT LIMITED TO THE WARRANTIES OF MERCHANTABILITY,
FITNESS FOR A PARTICULAR PURPOSE AND NONINFRINGEMENT. IN NO EVENT SHALL THE
AUTHORS OR COPYRIGHT HOLDERS BE LIABLE FOR ANY CLAIM, DAMAGES OR OTHER
LIABILITY, WHETHER IN AN ACTION OF CONTRACT, TORT OR OTHERWISE, ARISING FROM,
OUT OF OR IN CONNECTION WITH THE SOFTWARE OR THE USE OR OTHER DEALINGS IN THE
SOFTWARE.


https://pytorch.org/vision/stable/models.html
"""

import pandas as pd
import torch 
import torch.nn as nn
import torch.nn.functional as F  
import torchvision

# human readable large numbers
from millify import millify

def get_nb_trainable_parameters(model):
    return sum([x.numel() for x in model.parameters() if x.requires_grad])


model_names = ["alexnet",
               "vgg11",
               "vgg11_bn",
               "vgg13",
               "vgg13_bn",
               "vgg16",
               "vgg16_bn",
               "vgg19",
               "vgg19_bn",
               "resnet18",
               "resnet34",
               "resnet50",
               "resnet101",
               "resnet152",
               "squeezenet1_0",
               "squeezenet1_1",
               "densenet121",
               "densenet169",
               "densenet161",
               "densenet201",
               "inception_v3",
               "googlenet",
               "shufflenet_v2_x0_5",
               "shufflenet_v2_x1_0",
               "shufflenet_v2_x1_5",
               "shufflenet_v2_x2_0",
               "mobilenet_v2",
               "mobilenet_v3_large",
               "mobilenet_v3_small",
               "resnext50_32x4d",
               "resnext101_32x8d",
               "wide_resnet50_2",
               "wide_resnet101_2",
               "mnasnet0_5",
               "mnasnet0_75",
               "mnasnet1_0",
               "mnasnet1_3"]

model_strings = []
for model_name in model_names:
    model_strings.append((model_name, "torchvision.models." + model_name + "(pretrained=False)"))

df = []
for model_name, model_string in model_strings:
    model = eval(model_string)
    nb_params = get_nb_trainable_parameters(model)
    df.append((model_name, nb_params))
df = pd.DataFrame(df, columns=["model", "nb_trainable_parameters"])
df["human_readable"] = df["nb_trainable_parameters"].apply(lambda x: millify(x, precision=2))
df.sort_values("nb_trainable_parameters", ascending=True, inplace=True, axis=0)
df = df[["model", "human_readable", "nb_trainable_parameters"]]

pd.set_option('display.max_rows', None)
print(df)
Read more »

nvidia GPU memo

Posted on 2021-07-03 | In Misc
| Words count in article 697

nvidia-smi

NVIDIA System Management Interface (nvidia-smi)

1
2
3
4
5
6
7
8
nvidia-smi

# If we just want the GPU name
nvidia-smi --query-gpu=name --format=csv,noheader

# The following will loop and call 
# the view at every second. 
nvidia-smi -l 1

Test whether GPU is being used

directly test with PyTorch

1
2
import torch
torch.cuda.is_available()

with nvidia-smi

With nvidia-smi can check whether Memory-Usage is (always) 0MiB / XXXXXMiB, whether Volatile GPU-Util is (always) 0%. In the bottom, there is the Processes section, one can check whether there is our process, or whether it is No running processes found.

gpustat

https://github.com/wookayin/gpustat

In order to install the python package gpustat

1
2
pip install --upgrade pip
pip install gpustat

To use gpustat

1
2
3
4
5
6
# basic command
gpustat

# refresh the information periodically 
# just like the command "top"
gpustat --watch

Default display (in each row) contains:

  • GPUindex (starts from 0) as PCI_BUS_ID
  • GPU name
  • Temperature
  • Utilization (percentage)
  • GPU Memory Usage
  • Running processes on GPU (and their memory usage)

nvcc

The following command may not be found in docker (it is only available in versions with tag devel )

1
nvcc --version

Docker

1
2
3
docker run -dit --gpus all [imageName] bash

docker run -dit --gpus all -v /[path1]/[dir_name]:/[path2]/[dir_name] [imageName] bash

Questions

  • Running more than one CUDA applications on one GPU

https://stackoverflow.com/questions/31643570/running-more-than-one-cuda-applications-on-one-gpu

CUDA activity from independent host processes will normally create independent CUDA contexts, one for each process. Thus, the CUDA activity launched from separate host processes will take place in separate CUDA contexts, on the same device. CUDA activity in separate contexts will be serialized. The GPU will execute the activity from one process, and when that activity is idle, it can and will context-switch to another context to complete the CUDA activity launched from the other process. The detailed inter-context scheduling behavior is not specified.

It seems that at any given instant in time, code from only one context can run. The “exception” to this case (serialization of GPU activity from independent host processes) would be the CUDA Multi-Process Server.

Troubleshooting

Rebooting can solve some problems: sudo reboot, then enter the sudo password

  • RuntimeError: CUDA error: CUBLAS_STATUS_NOT_INITIALIZED when calling cublasCreate(handle) /opt/conda/conda-bld/pytorch_1616554793803/work/aten/src/THCUNN/ClassNLLCriterion.cu:108: cunn_ClassNLLCriterion_updateOutput_kernel: block: [0,0,0], thread: [0,0,0] Assertion t >= 0 && t < n_classes failed.

This possibly means that there is an IndexError: Target XXX is out of bounds. error.

  • torch.cuda.is_available() returns False and UserWarning: CUDA initialization: Unexpected error from cudaGetDeviceCount(). Did you run some cuda functions before calling NumCudaDevices() that might have already set an error? Error 804: forward compatibility was attempted on non supported HW (Triggered internally at /opt/conda/conda-bld/pytorch_1616554793803/work/c10/cuda/CUDAFunctions.cpp:109.) return torch._C._cuda_getDeviceCount() > 0

https://stackoverflow.com/questions/66371130/cuda-initialization-unexpected-error-from-cudagetdevicecount

This problem is not solved.

Common GPUs

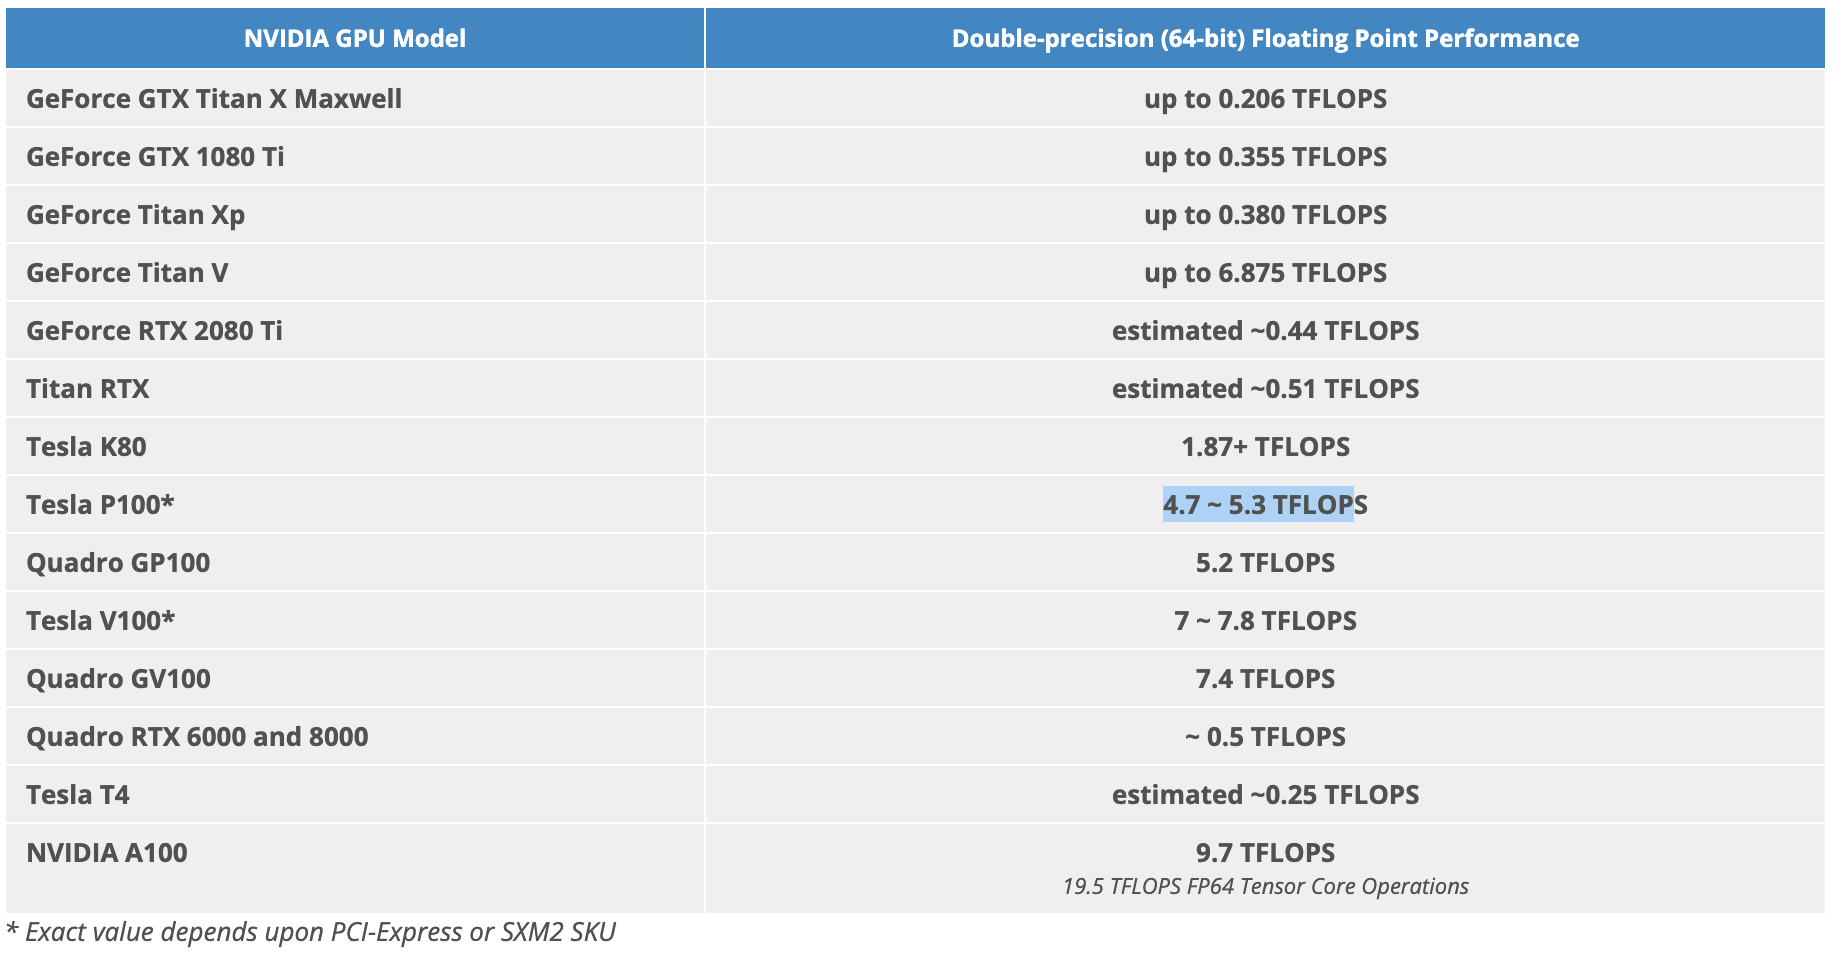
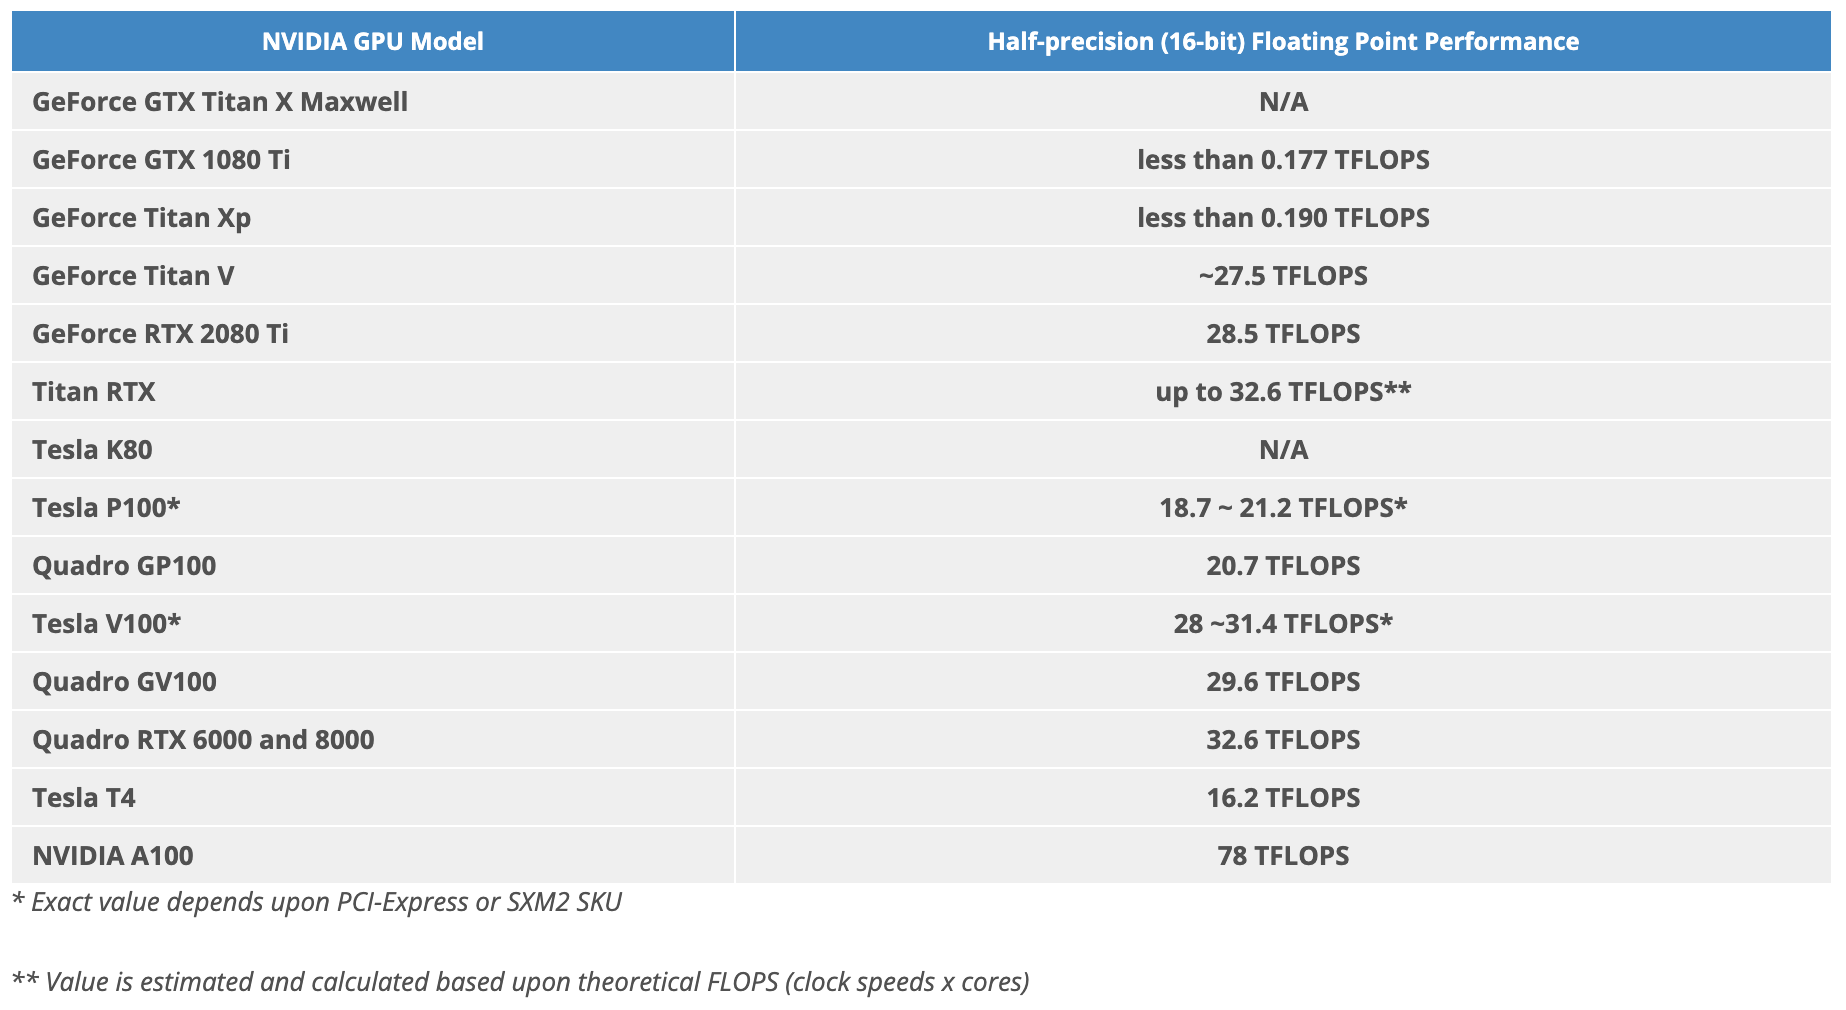
Tesla V100 is the fastest NVIDIA GPU available on the market (however, A100 seems to be even faster than V100). V100 is 3x faster than P100.

FP64 64-bit (Double Precision) Floating Point Calculations:

nvidia-gpu-64.png

FP16 16-bit (Half Precision) Floating Point Calculations:

nvidia-gpu-16.png

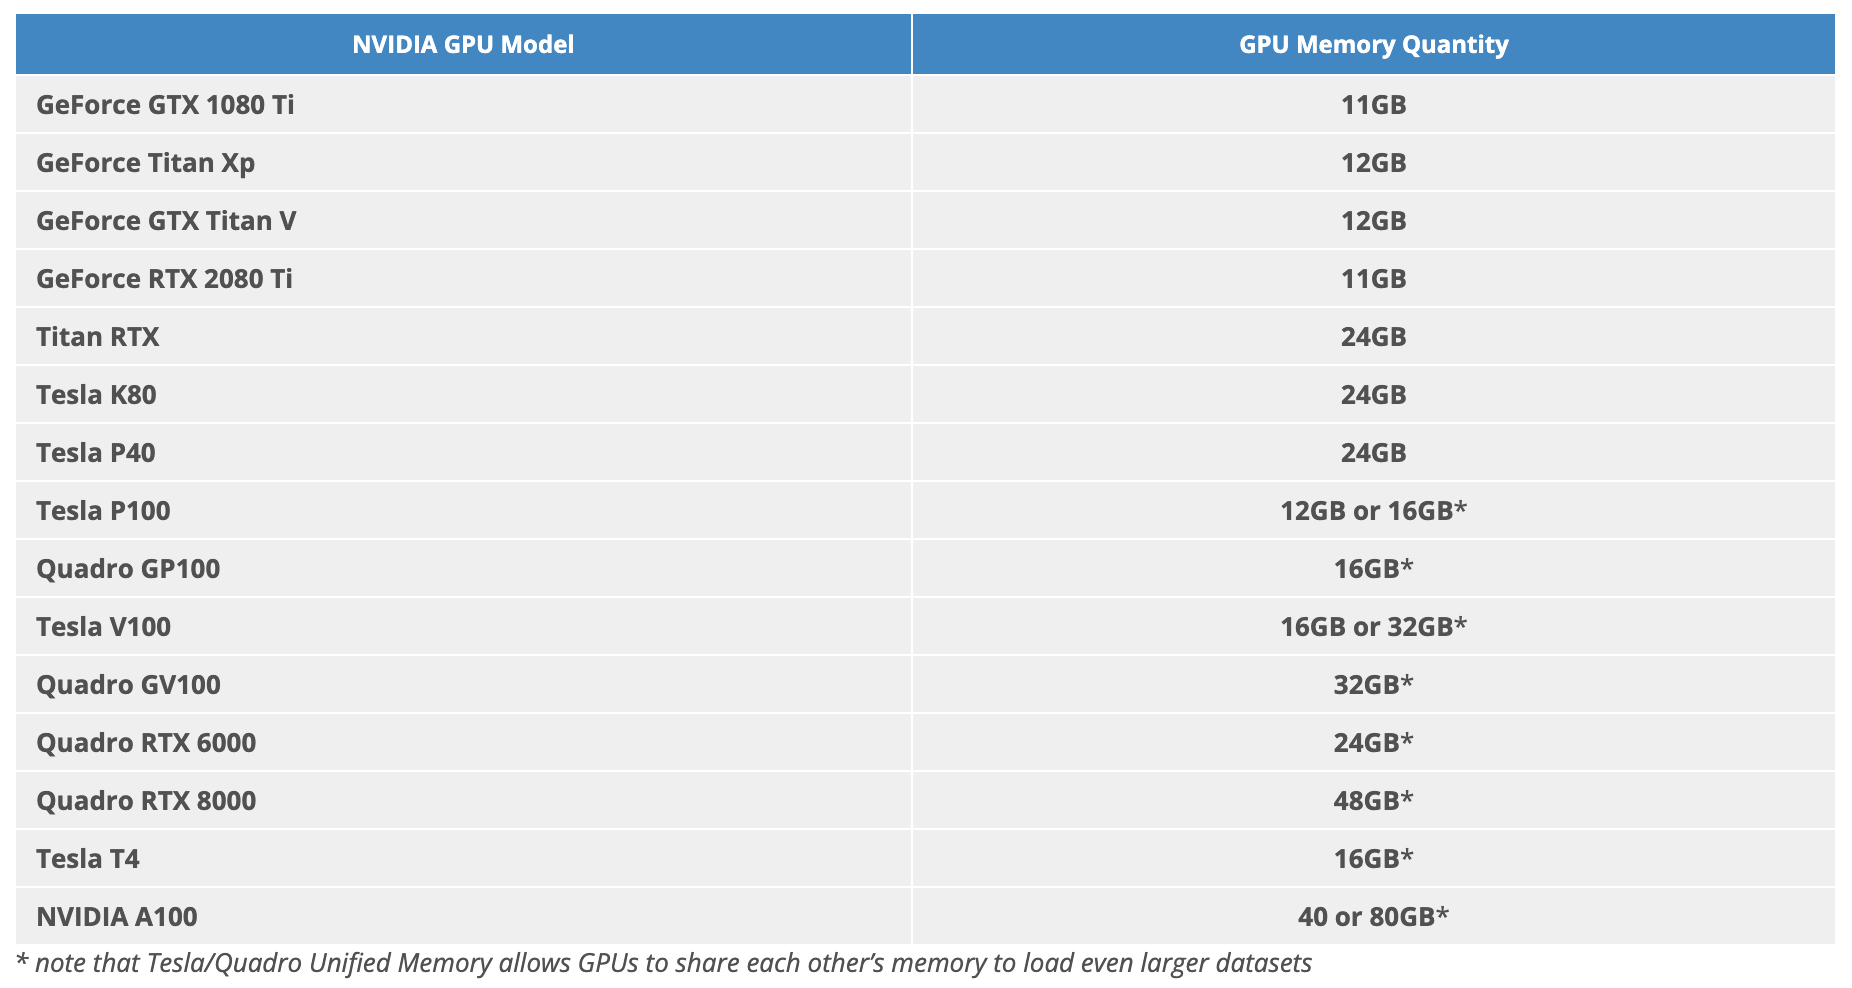
GPU Memory Quantity:

nvidia-gpu-memory.png

Estimated price on Google Cloud Platform:

  • Tesla T4: $0.28 hourly
  • Tesla K80: $0.35 hourly
  • Tesla P4: $0.45 hourly
  • Tesla P100: $1.06 hourly
  • Tesla V100: $1.77 hourly
  • Tesla A100: $2.79 hourly

GPU memory:

  • GeForce RTX 2080 Ti: 11 GB
  • Tesla T4: 16 GB
  • K80: 24 GB
  • Tesla P4: 8 GB
  • P100: 12 GB or 16 GB
  • V100: 16 or 32 GB
  • A100: 40 GB or 80 GB
Read more »

Linux system memo

Posted on 2021-06-17 | In Misc
| Words count in article 1544

Printing and writing to files

echo is usually used for printing message in the terminal, much like the printing function in programming languages. echo can also be used to write a string into a file if it is used together with a redirection operator. For example:

1
echo "blablabla" > [file_path]

Redirect output of a program to a file

1
program [arguments...] > logs.txt

However, by doing the above no message will be output to the terminal (stdout).

Redirect output of a program both to a file and stdout

2>&1 dumps the stderr and stdout streams. tee logs.txt takes the stream it gets and writes it to the screen and to the file logs.txt.

1
program [arguments...] 2>&1 | tee logs.txt

Users and groups in linux

确定你在Linux或类Unix系统中的角色(即你当前的用户身份和用户组)

使用 whoami 命令可以显示你当前的用户名

ID command

使用 id 命令可以查看你的用户ID、主组ID以及附加组信息。uid是用户ID。gid是主组ID。groups显示你所属的所有组,包括主组和附加组。

The id command prints information about the specified user and its groups.

If the username is omitted it shows information for the current user.

1
id

To get information about a specific user

1
id [user_name]

Groups

In order to list all groups in Linux

1
cat /etc/group

Like /etc/passwd, there is one entry per line, all fields are separated by a colon :. The first field is the name of group group_name. If you run ls -l command, you will see this name printed in the group field. The second field is the password, generally password is not used, hence it is empty/blank. It can store encrypted password. This is useful to implement privileged groups. The third field is the Group ID (GID), each user must be assigned a group ID. You can see this number in your /etc/passwd file. The fourth field is the group List, it is a list of user names of users who are members of the group. The user names, must be separated by commas.

可以使用 groups 命令查看 你所属的所有组。

In order to list all groups the current user belongs to (the first group is the primary group)

1
groups

To get a list of all groups a specific user belongs to, provide the username to the groups command as an argument

1
groups [user_name]

Users

In order to list all users in Linux

1
cat /etc/passwd

Each line corresponds to a user, for example,

1
mike:x:1242:1308:,,,:/home/mike:/bin/bash

where mike is the user name or login name. x is the encrypted password is stored in the /etc/shadow file. 1242 is the UID (user ID number). 1308 is the primary GID (group ID number). Then it is GECOS. It may includes user’s full name (or application name, if the account is for a program), building and room number or contact person, office telephone number, home telephone number and any other contact information. /home/mike is the home directory for the user. /bin/bash is the login shell for the user. Pathnames of valid login shells comes from the /etc/shells file.

Adding a new user

Example using adduser

1
adduser --disabled-password --gecos '' --shell /bin/bash [user_name]
  • --disabled-password login only possible using SSH RSA keys
  • --gecos sets the gecos field for the new entry generated.
  • --shell sets the user’s login shell, rather than the default specified by the configuration file.

File permission

In Linux, access to the files is controlled by the operating system using file permissions, attributes, and ownership. Each file is owned by a particular user and a group and assigned with permission access rights for three different classes of users:

  • The file owner
  • The group members
  • Others (everybody else)

There are three file permission types that apply to each user class. You can specify which users are allowed to read the file, write to the file, or execute the file. The same permission attributes apply for both files and directories with a different meaning:

  • The read permission The file is readable. For example, when the read permission is set, the user can open the file in a text editor. The directory’s contents can be viewed. The user can list files inside the directory with the ls command.
  • The write permission The file can be changed or modified. The directory’s contents can be altered. The user can create new files , delete existing files , move files , rename files ..etc.
  • The execute permission The file can be executed. The directory can be entered using the cd command.

File permissions can be viewed using the ls -l command. For example:

1
ls -l filename.txt
1
2
3
4
5
6
7
8
9
10
-rw-r--r-- 12 linuxize users 12.0K Apr  8 20:51 filename.txt
|[-][-][-]-   [------] [---]
| |  |  | |      |       |
| |  |  | |      |       +-----------> 7. Group
| |  |  | |      +-------------------> 6. Owner
| |  |  | +--------------------------> 5. Alternate Access Method
| |  |  +----------------------------> 4. Others Permissions
| |  +-------------------------------> 3. Group Permissions
| +----------------------------------> 2. Owner Permissions
+------------------------------------> 1. File Type

The first character shows the file type. It can be a regular file -, directory d, a symbolic link l, or any other special type of file. The next nine characters represent the file permissions, three triplets of three characters each. The first triplet shows the owner permissions, the second one group permissions, and the last triplet shows everybody else permissions.

File permission can be represented in a numeric or symbolic format. The permission number can consist of three or four digits, ranging from 0 to 7. When 3-digit number is used, the first digit represents the permissions of the file’s owner, the second one the file’s group and the last one all other users.

  • r (read) = 4
  • w (write) = 2
  • x (execute) = 1
  • no permissions = 0

The permission digit of a specific user class is the sum of the values of the permissions for that class. Each digit of the permission number may be a sum of 4, 2, 1 and 0:

  • 0 (0+0+0) – No permission
  • 1 (0+0+1) – Only execute permission
  • 2 (0+2+0) – Only write permission
  • 3 (0+2+1) – Write and execute permissions
  • 4 (4+0+0) – Only read permission
  • 5 (4+0+1) – Read and execute permission
  • 6 (4+2+0) – Read and write permissions
  • 7 (4+2+1) – Read, write, and execute permission

When a 4-digit number is used, the first digit is used for something else. We do not cover it in this memo.

chmod allows changing the file permission.

1
2
3
4
5
6
7
8
9
10
11
# 拥有者有读、写和执行权限(rwx),同组用户有读和执行权限(r-x),其他用户有读和执行权限(r-x)。
chmod 755 [filename]

# read permission for the owner, all others have no permissions at all
chmod 400 [filename]

# read and write permissions for the owner, all others have no permissions at all
chmod 600 [filename]

# read and write permissions for the owner, read permission for all others
chmod 644 [filename]

Ownership

chown changes the user and/or group ownership of each given file.

  • If only an owner (a user name or numeric user ID) is given, that user is made the owner of each given file, and the files’ group is not changed.
  • If the owner is followed by a colon and a group name (or numeric group ID), with no spaces between them, the group ownership of the files is changed as well.
  • If a colon but no group name follows the user name, that user is made the owner of the files and the group of the files is changed to that user’s login group.
  • If the colon and group are given, but the owner is omitted, only the group of the files is changed; in this case, chown performs the same function as chgrp.
  • If only a colon is given, or if the entire operand is empty, neither the owner nor the group is changed.
1
 -R, --recursive
1
2
3
4
chown owner-user file 
chown owner-user:owner-group file
chown -R owner-user:owner-group directory
chown options owner-user:owner-group file

To change the group ownership of a file/directory Target to the group GroupA

1
chgrp -R project_name file_or_directory
Read more »

slurm memo

Posted on 2021-06-10 | In Misc
| Words count in article 480

Basics

1
2
3
4
5
6
7
8
9
10
11
12
13
14
15
16
17
18
19
squeue

squeue|grep <user_name>

sacct

sacct|grep FAILED

scontrol show job <jobID>

sshare

sshare|grep <user_name>

sshare -a

sbatch <slurm_script>

srun <command>

Format

header

1
2
3
4
5
6
7
8
9
10
11
12
13
14
15
16
17
18
19
20
21
22
23
24
25
26
27
28
29
30
31
32
33
34
35
36
37
38
39
#!/bin/bash
#SBATCH --gres=gpu:1
#SBATCH --job-name=<job_name>
#SBATCH --partition=<partition_name>
#SBATCH --qos=<qos_name>
#SBATCH --mem=32g
#SBATCH --nodes=1
#SBATCH --cpus-per-task=4
#SBATCH --output=logs/%j.stdout
#SBATCH --error=logs/%j.stderr
#SBATCH --open-mode=append
#SBATCH --signal=B:USR1@120
#SBATCH --requeue
#SBATCH --nodelist=<node_name>

SECONDS=0

restart(){
	echo "Calling restart" 
	scontrol requeue $SLURM_JOB_ID
	echo "Scheduled job for restart" 
}

ignore(){
	echo "Ignored SIGTERM" 
}
trap restart USR1
trap ignore TERM

date 

# Main work starts


# Main work ends

DURATION=$SECONDS

echo "End of the program! $(($DURATION / 60)) minutes and $(($DURATION % 60)) seconds elapsed." 
1
2
3
4
5
6
7
8
9
10
which python 

echo "Slurm job ID: $SLURM_JOB_ID" 

echo "CUDA_VISIBLE_DEVICES is $CUDA_VISIBLE_DEVICES" 

echo "Visualize environment variables HTTP_PROXY and HTTPS_PROXY:" 

echo $HTTP_PROXY 
echo $HTTPS_PROXY 

Job array:

1
2
3
#SBATCH --array=0-19%5
#SBATCH --output=logs/%A_%a.stdout
#SBATCH --error=logs/%A_%a.stderr
1
2
3
4
5
6
7
8
9
10
11
12
13
14
15
16
17
18
19
20
21
22
23
24
25
# Main work starts

args=()

for SEED in "21" "31" "41"
do
	for MODEL in "xxx" "yyy"
	do
		for WD in "0" "0.01" "0.1"
		do
			for LR in "0.001" "0.01"
			do
				args+=("blabla.py --model_name ${MODEL} --random_seed ${SEED} --num_workers 8 --lr ${LR} --weight_decay ${WD}")
			done
		done 
	done
done

echo "Starting python ${args[${SLURM_ARRAY_TASK_ID}]}"

srun python ${args[${SLURM_ARRAY_TASK_ID}]}

echo "End python ${args[${SLURM_ARRAY_TASK_ID}]}"

# Main work ends

How to choose nodes (suppose that we want to use nodes 51, 52, 53, 54, 55, 101, 102, we do not want to use nodes 1, 2, 3, 4, 5):

1
#SBATCH --exclude=n[1-5]

Or equivalently,

1
#SBATCH --nodelist=n[51-55,101-102]	

Advanced

Changing the maximum number of simultaneously running tasks for a running array job

1
scontrol update JobId=<jobID> ArrayTaskThrottle=<count>

Change the list of excluded nodes:

1
2
3
4
5
# Value may be cleared with blank data value, "ExcNodeList="
scontrol update JobId=<jobID> ExcNodeList=

# Multiple node names may be specified using simple node range expressions (e.g. "n[1-5]")
scontrol update JobId=<jobID> ExcNodeList=n[1-5]
Read more »

tmux memo

Posted on 2021-04-11 | In Misc
| Words count in article 554

Basics

By default the key combination Ctrl + B is called the prefix. It must be pressed and released before press the specific shortcut key! It is important to know that all the keys are not pressed together, we need to first release the pressed prefix, then press the specific shortcut key.

On MacOS, the default prefix is also Ctrl + B, it is neither Cmd + B nor alt + B.

为了避免Ctrl + B先按到B,建议先按Ctrl,按着不放的情况下再按B。然后两个一起松开,再按第三个键(中间可以间隔很多时间)。

  • Session: The largest unit managed by tmux. “attach/detach” to the session. Even if you detach from the session, the session continues to run in the background. Multiple sessions can be opened at the same time, each session can have multiple windows. If no name is given, the session will use numbers as its name.
  • Window: This is the same tab that exists in the session. You can have multiple windows in one session. You can create and switch windows within a session and switch the entire screen as you move tabs.
  • Pane: This is the screen unit existing in the window. You can have multiple panes in a window. If you divide the entire screen vertically by two, two panes are created.

Session

Start session

1
2
3
4
tmux

# start session with a given name
tmux new -s session_name

Exit session

1
exit

Detach session

1
<prefix> + d

Attach session

1
2
3
4
5
# convenient if only one session exists 
tmux attach

# attach to a specific session
tmux attach -t [session_name]

Session list

1
2
3
4
tmux ls

# if tmux is not started, you'll see
# no server running on [...]

Kill session

1
tmux kill-session -t [session_name]

Rename a session in tmux

1
2
<prefix> + :     # open the command line
rename-session [new-name]

Window

<prefix> + :

  • c create window
  • & kill the current window
  • w list windows, which enables switching between windonws
  • n next window
  • p previous window

Rename a window in tmux

1
2
<prefix> + :    # open the command line
rename-window [new-name]

移动 window 到指定位置,改变 tmux window 的编号(用来填补删掉的空缺的 window 编号)

1
tmux move-window -t <target-index>

if <target-index> is occupied, then we will see index in use. if <target-index> is the same as the current index, then we will see same index.

Pane

<prefix> + :

  • " split into top/bottom panes
  • % split into left/right panes
  • x kill the current pane
  • 四个方向键 switch between panes

Scroll mode

Prefix then [ then you can use your normal navigation keys to scroll around (eg. Up Arrow or PgDn). Press q to quit scroll mode.

Progress bar in tmux

The problem arises from reattaching to a tmux with a smaller screen. If you reattach in a smaller window, and the size of the output shrinks and gets messed up. But then, if you resize the window to it’s larger size, the output does not enlarge.

One solution:

  • Use tmux sessions in Full Screen, enter Full Screen before attaching to a tmux session
Read more »
1 2 … 4
Sun Haozhe

Sun Haozhe

GitHub IO blogs

78 posts
4 categories
16 tags
GitHub
© 2019 - 2024 Sun Haozhe
Powered by Jekyll
Theme - NexT.Mist